Before I begin with the project description I consider it pretty important that you get to know how de communication with the mobile phone is done. For this you should check out the following links first.
The first link is a link to the wikipedia site that helps you udnerstand the basics of the AT (Hayes) Command Set:
http://en.wikipedia.org/wiki/Hayes_command_set
The following link is a .pdf file that lists the AT commands that you need to send to the mobile phone through the serial interface. The AT commands are basically the same for most GSM modules/phones with slight variations.
http://ebookbrowse.com/s35i-c35i-m35i-atc-commandset-v01-pdf-d29637636
Finally I added this link that explains in detail how to send and receive SMS messages with the help of AT commands and how exactly those messages are encoded (PDU format):
http://www.dreamfabric.com/sms/

2. Description of the individual blocks
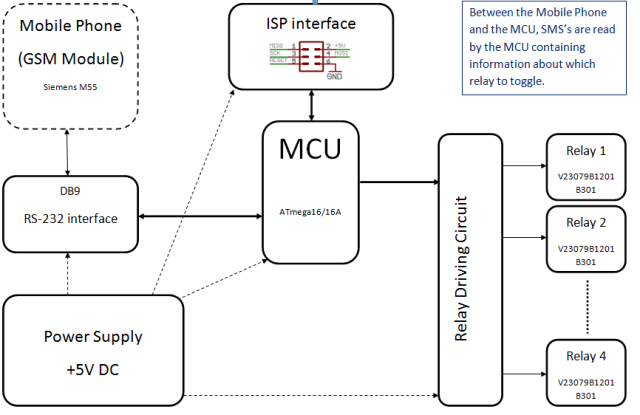
As mentioned above I have chosen the ATmega16A microcontroller. The program I have written takes up less then 8kB so an ATmega8A would be just as good. You can look for microcontrollers from other manufacturers as well. All this project needs is a standard IO port with 8 pins and an asynchronous serial interface (RX and TX pins). Also for ease of programming ISP capability would be good.The first link is a link to the wikipedia site that helps you udnerstand the basics of the AT (Hayes) Command Set:
http://en.wikipedia.org/wiki/Hayes_command_set
The following link is a .pdf file that lists the AT commands that you need to send to the mobile phone through the serial interface. The AT commands are basically the same for most GSM modules/phones with slight variations.
http://ebookbrowse.com/s35i-c35i-m35i-atc-commandset-v01-pdf-d29637636
Finally I added this link that explains in detail how to send and receive SMS messages with the help of AT commands and how exactly those messages are encoded (PDU format):
http://www.dreamfabric.com/sms/

2. Description of the individual blocks
The ISP interface is a simple 6 pin (3×2) header connected to the corresponding pins of the microcontroller. I have designed mine to work with the AVRISP mkII that connects to the USB port of the PC. There are many different possibilities to make your own in-system-programmer but most of them are either designed for a parallel or serial port or require a programmed microcontroller. Also the AVRISP mkII is very easy to use with AVR Studio and not too expensive.
Since I use the data cable of the Siemens M55 to communicate with it and didn’t want to destroy it I had to translate my TTL level serial communication from the microcontroller to RS-232 levels. If you have a GSM module that works with TTL levels (or connect directly to the corresponding pins of the phone, that also operate at TTL levels) you don’t need a level converter and can connect the module directly to the RX and TX pins of the microcontroller. If you use a data-cable that operates at RS-232 levels (designed to communicate with PC) then you need a MAX232 or similar IC. The MAX232 is very easily implemented. It only needs some capacitors and you can connect the RX and TX pins of the TTL levels on one side and get RS-232 levels on the other. The following image should give you a better idea of what I am talking about if you didn’t use this IC before. The picture is from the MAX232 datasheet

The capacitors are of 1uF each.
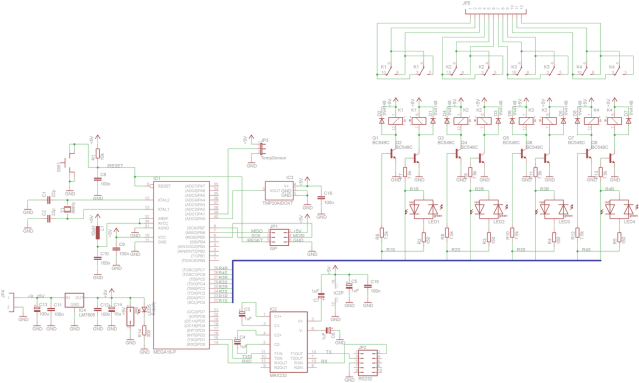
I will describe the relay driving circuit for 1 relay. It is the same for the other 3 relays. The relays that I have used are latching type relays with 2 coils. Both coils can be sued to set or reset the relay. To keep the command simple I have used one IO pin to set and one IO pin to reset the relay, commanding the two coils individually. To be able to supply the necessary current for the relay to latch, I have used npn transistors with a current limiting resistor in the base of the transistor, that is connected to the microcontroller IO pin. Since I use 2 IO pins to command each relay and those lines are always at different logic values (either the set or the reset line are at +5V) I have mounted a bicolor led and a current limiting resistor between the two IO lines to visualize the position of the relays. For a better understanding of the relay driving circuit look at the schematic further down.
The capacitors are of 1uF each.
The power supply consists of a 7805 voltage regulator. It can be supplied by any DC voltage between 7 and 35V (35V is the absolute maximum rating. I wouldn’t go that high
3. Electrical schematic
I have designed this project in EAGLE. Since the dimensions are not that big the light (free) version of EAGLE was all I needed.
Also worth mentioning is that I have connected one of the pins of the ADC to a 3 pin header along with VCC and GND to be able to add a temperature sensor to the project in case I decide to modify the project. If you don’t want this you can also leave the AREF and AVCC pins unconnected.
I will only post the complete layout with both Top and Bottom sides. The EAGLE file is linked below.
The drill sizes are rounded to mm’s. So if you’re living in the stone age and don’t use the metric system
I have uploaded the schematic and the board layout to a free file hosting server but I don’t know how long it will stay up. If you want it and the link isn’t working just send me a mail. The folder also contains the component library. Link: http://www.mediafire.com/?h6taq8dk9g2xq
4. Software
The software was written in AVR Studio with the WinAVR plugin installed. I have written it in c programming language since assembly is just a pain in the a**.
- you initialize the serial port, the phone and set the IO pins to output;
- you keep asking the phone if it has any unread messages (with the AT command “at+cmgl=0″)
- if so you check whether the message starts with a ‘R’ or a ‘r’. This is because the message to change the relay positions has to be “R xxxx” where x is either 1 or 0 according to what position the relay has to have. Also this allows us to ignore messages from other people.
- if the message starts accordingly you modify the relay positions so that they correspond to the SMS.
The code for the programming is uploaded on mediafire here is the link >>http://www.mediafire.com/?p6ed2aevw7c447h just download it and burn it on the microcontroller using AVR studio 4 njoy….. 
God bless us all..... :-)


Great read! I wish you could follow up to this topic
ReplyDeletearoma essential oils